A cross between brioche and challah, this bread (called kulich) is a lightly sweetened, egg-glazed cylinder, often baked in a coffee can to make a tall loaf. The kulich
would sit proudly in the center of the family Easter basket, surrounded
by meats, cheeses, butter, and eggs. It's a central part of the Easter
meal, served with sweet paskha cheese or unsalted butter.
Ingredients
1 cup whole milk
1/2 cup sugar plus a pinch
1 1/2 sticks (3/4 cup) unsalted butter
Pinch of saffron threads, crumbled
2 teaspoons salt
2 1/2 teaspoons active dry yeast (from a 1/4-oz package)
1/4 cup lukewarm water (105–115°F)
6 cups all-purpose flour plus additional for dusting
4 large eggs
Special equipment: 2 (5- to 6-cup) soufflé dishes or 2 (2-pound) cleaned empty coffee cans
Preparation
Make dough:
Heat milk, sugar, butter, saffron, and salt in a 1-quart
heavy saucepan over moderate heat, stirring occasionally, until butter
is melted and sugar is dissolved, about 2 minutes. Remove from heat and
cool to lukewarm.
Meanwhile, stir together yeast, warm water, and pinch of
sugar and let stand until foamy, about 5 minutes. (If mixture doesn't
foam, discard and start over with new yeast.)
Put flour in a large bowl and make a large well in
center. Lightly beat 3 eggs and add to well along with milk and yeast
mixtures. Carefully stir together with a wooden spoon, gradually
incorporating flour, until a soft dough forms. Transfer dough to a
lightly floured surface and knead, dusting with just enough flour to
keep dough from sticking, until smooth and elastic, about 10 minutes.
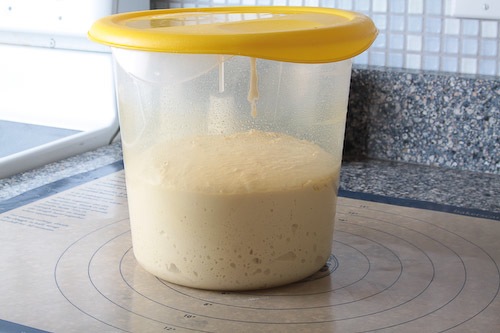
Put dough in a lightly oiled large bowl, turning to coat with oil, and
let rise, covered with a clean kitchen towel, in a draft-free place at
warm room temperature until doubled in bulk, about 3 hours.
Punch down dough and let rise again, covered with towel, until doubled in bulk, about 1 hour.
Form loaves:
Generously butter soufflé dishes. Punch down dough and
divide in half. Loosely wrap 1 piece in plastic wrap and set aside. Cut
away one third of remaining piece of dough and reserve, then roll
remaining two thirds into a large ball and transfer to a soufflé dish.
Roll reserved piece of dough into an 18-inch-long rope
on work surface with palms of your hands. Cut rope into 3 equal pieces
and lay pieces vertically side by side on work surface, about 1/4 inch
apart. Gather 3 ends farthest from you and press them together, then
braid strands, pressing together other ends to secure braid. Lay braid
over top of dough in soufflé dish (trim braid if using coffee cans).
Form another loaf with remaining dough in same manner.
Cover loaves with clean kitchen towel and let rise in
draft-free place at warm room temperature until doubled in bulk, about 1
1/2 hours (loaves will rise about 1 inch above rims of dishes).
Bake loaves:
Put oven rack in middle position and preheat oven to 350°F.
Lightly beat remaining egg with a large pinch of salt,
then brush egg over top of each loaf. Bake loaves until golden brown and
bread sounds hollow when tapped on bottom, about 1 hour. Turn loaves
out onto a rack, then turn right side up and cool completely.
This decorative Easter
bread has whole eggs baked into it! Do not cook the whole eggs, as they
will bake at the same time that the bread does. The eggs can also be
dyed for extra color.
Original recipe makes 1 - 1 pound loaf
Directions
In a large
bowl, combine 1 cup flour, sugar, salt and yeast; stir well. Combine
milk and butter in a small saucepan; heat until milk is warm and butter
is softened but not melted.
Gradually add
the milk and butter to the flour mixture; stirring constantly. Add two
eggs and 1/2 cup flour; beat well. Add the remaining flour, 1/2 cup at a
time, stirring well after each addition. When the dough has pulled
together, turn it out onto a lightly floured surface and knead until
smooth and elastic, about 8 minutes.
Lightly oil a
large bowl, place the dough in the bowl and turn to coat with oil.
Cover with a damp cloth and let rise in a warm place until doubled in
volume, about 1 hour.
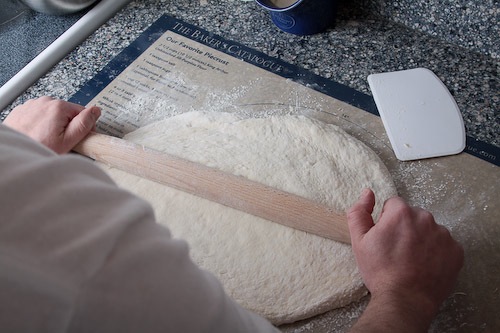
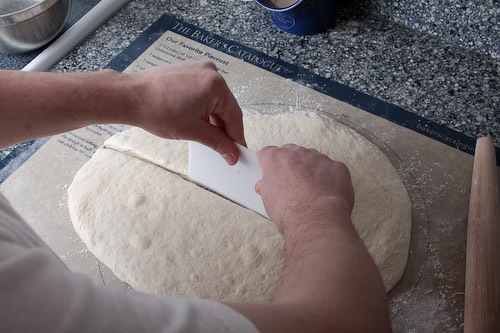
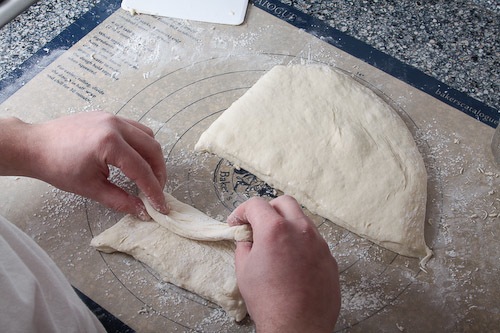
Deflate the
dough and turn it out onto a lightly floured surface. Divide the dough
into two equal size rounds; cover and let rest for 10 minutes. Roll each
round into a long roll about 36 inches long and 1 1/2 inches thick.
Using the two long pieces of dough, form a loosely braided ring, leaving
spaces for the five colored eggs. Seal the ends of the ring together
and use your fingers to slide the eggs between the braids of dough.
Preheat oven
to 350 degrees F (175 degrees C). Place loaf on a buttered baking sheet
and cover loosely with a damp towel. Place loaf in a warm place and let
rise until doubled in bulk, about 45 minutes. Brush risen loaf with
melted butter.
Bake in preheated oven for 50 to 55 minutes, or until golden.
This gluten-free French bread truly hits the spot. It satisfies any
bread cravings you may have, and you can make it in under an hour. My
recipe is adapted from Carol Fenster’s recipe in Gluten-Free 101: Easy, Basic Dishes Without Wheat
. It’s a small book, but contains some great bread recipes and is well worth the price.
Ingredients
1 cup sorghum flour
1½ cup potato starch
½ cup tapioca starch
1½ teaspoon salt
1 Tablespoon sugar
1 teaspoon xanthan gum
1 teaspoon guar gum (or xanthan)
1½ Tablespoon instant yeast
1 Tablespoon olive oil
3 large egg whites
1 teaspoon cider vinegar
1 cup warm water (105 – 115 degrees)
Instructions
In the bowl of your mixer, combine the dry ingredients.
Add the olive oil and egg whites and mix to incorporate.
Add the vinegar and most of the water. Beat for 2 minutes, adding the remaining water if needed to make a soft dough.
Spoon the dough
onto the pan and carefully shape with a spatula. Because the dough is
soft, it will go through the small holes in the pan. Don’t press hard
when shaping.
If you like, you can brush the top with beaten egg white.
Use a sharp knife to cut several slits in the top of each loaf.
Place the pan in a cold oven on a middle rack. Turn the oven on to 425 degrees and begin timing for 30 – 35 minutes.
Don't attempt to slice the bread for at least 10 hours after baking. It's actually best two or three days old.
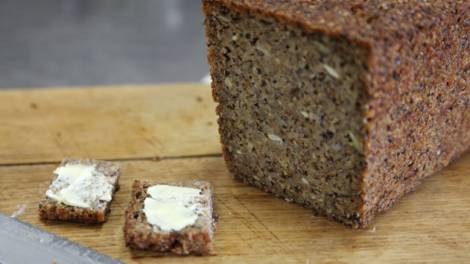
Resting time 7 days Level of difficulty Confident cook Season All year round
You will need to begin this recipe seven days ahead.
Ingredients
stage 1 (approximately 5 days) sourdough starter 250 ml (1 cup) buttermilk 65 g (½ cup) organic rye flour ½ tsp salt
stage 2 (12–36 hours) sponge 100–200 g sourdough starter 750 ml (3 cups) cold water 100 g (⅔ cup) wholemeal wheat flour 50 g organic rye flour 100 g (⅔ cup) organic plain flour 75 g (½ cup) linseeds 75 g (½ cup) raw sunflower seeds 175 g (1 cup) cracked rye grains 200 g (1 ¼ cups) cracked wheat grains 2 tsp kosher or sea salt
stage 3 (3–12 hours) 1 tbsp malt powder 1 tbsp molasses 150g cooked barley grains 500 g (3 cups) cracked rye grains, soaked overnight extra virgin olive oil, for greasing melted butter, for brushing
Preparation
To make the
sourdough starter, mix all ingredients in a bowl. Stand, uncovered, at
room temperature. Amounts given are approximate; mixture should be quite
fluid. Add more buttermilk or water if starter thickens too much. You
can also use good plain yoghurt instead of buttermilk, but add water if
you do. Stir with a spoon at least once a day. Keep it loosely covered
with paper or foil from the second day. Don't refrigerate.
From
the second or third day, little air bubbles will form in the starter,
and it will probably have a more greyish colour than it did at first. It
should also begin to smell slightly sour, but the smell disappears upon
stirring. Usually the starter takes about 5 days to make. It's ready
when it has swollen somewhat in volume and the air bubbles are plentiful
after resting for about 6 hours. The quality of the starter is not
terribly crucial; rugbroed doesn't (and shouldn't) rise very much during
baking, especially not the no-knead type. With many grains and very
little flour, high-yeast activity would produce too-crumbly a result.
If
you can remember, discard a little of the sourdough and feed it with
water and rye flour a couple of times per month. Make sure it is fairly
thick, though, to inhibit yeast activity and make it less vulnerable to
forgetfulness. (see note)
To make the sponge, mix 100–200g of the
sourdough starter and the remaining ingredients in a large bowl. Cover
with a wet towel and stand in a warm place until the next day, or for at
least 12 hours, but up to 36 hours is fine. Sourness increases with
standing, but won't be very predominant in the final result anyway.
Dampen the towel when dry to prevent moisture loss from the sponge,
which could affect the final result.
The sponge is very thin and liquid when just mixed, but will quickly become quite thick from the grains absorbing liquid.
To
make the dough, add the malt powder, molasses, cooked barley and soaked
rye to the sponge and combine well. Pour into a lightly greased 2-litre
capacity loaf tin. If you think you'd like to make this bread again,
save 1 cup of dough to use as a starter next time. Put this in a jar,
sprinkle with 2 teaspoons coarse salt, cover tightly and refrigerate.
The dough should be wet and just barely liquid, like a very thick
porridge.
Stand bread to rise in loaf tin, covered with a damp
towel, for at least 3 hours, or a day, at room temperature (or warmer if
you use the shorter rising time.) The longer the proof, the more sour
the taste. The bread won't rise very much, perhaps only an inch or so.
Paint
the top of the bread with melted butter or cold water. Put it in a cold
oven and set the temperature at 190˚C. From the time the oven is warm,
the baking time is about 90 minutes. If the top looks like it's
blackening, cover with foil.
It's very difficult to tell when
the bread is done. Take it out of tin and knock the base with your fist.
If it doesn’t resonate hollowly, it certainly isn't done. If it sounds
hollow, insert a bamboo skewer into the centre. If the tip comes out
clean, it is probably done. The crust should feel quite hard. If in
doubt, leave the bread in the oven as the oven cools.
Place the bread on a rack and cover with a towel (unless you are leaving it in the oven). Stand overnight.
From
the day after it is baked, store the rugbroed in a bread box or plastic
bag at cool room temperature. It freezes quite well, but tends to
become a little crumbly after thawing. Rugbroed stays fresh for about a
week.
Note If
you use an old starter to make this bread, it's a good idea to take it
out of the refrigerator a day before making the sponge. Stir it up with
water to a wet dough and let it rest covered at room temperature. This
will revive the yeast activity and give you a better rise in the final
bread. If
you don't plan to use a freshly made starter immediately, cover tightly
and refrigerate. It keeps for about a week. If you want to keep it
longer, feed it with rye flour to make a somewhat thicker dough. That
will keep for several weeks. When making this a second time, omit this
salt since it has already been sprinkled on your starter. If
the bread seems very wet inside upon slicing, try putting it back in
the oven to be warmed through at a fairly low temperature, about 30
minutes at 100˚C. Even a perfectly baked loaf will be a little sticky
the day after it is baked, but it improves over another day or two. If
the crust stays extremely hard on the second day, try lowering the oven
temperature a little and extending the baking time the next time you
attempt it. Much depends on the shape of your loaf pan (wide and flat or
short and tall makes a world of difference) and on the actual moistness
of the dough. I can only recommend that you make careful notes about
what you are doing so you know what to adjust a second or third time.
Mix the dry ingredients with the wet
until just combined (don't overstir) for the best result. This is
tastiest warm from the oven, but leftovers are also delicious.
Ingredients
3/4 cup old-fashioned rolled oats (about 2.5 ounces), divided
Cooking spray
4.5 ounces all-purpose flour (about 1 cup)
1 ounce whole-wheat flour (about 1/4 cup)
1 teaspoon baking powder
1/2 teaspoon baking soda
1/4 teaspoon salt
1/2 cup granulated sugar
1/2 cup packed brown sugar, divided
1/3 cup butter, softened
2 large eggs
1 teaspoon vanilla extract
1 (8-ounce) carton light sour cream (such as Daisy)
2 tablespoons finely chopped walnuts, toasted
1/2 teaspoon ground cinnamon
1 tablespoon chilled butter, cut into small pieces
Preparation
1. Preheat oven to 350°.
2. Spread oats in a single layer on a baking sheet. Bake at 350° for
6 minutes or until oats are barely fragrant and light brown.
3. Coat a 9-inch spring-form pan with cooking spray; set aside.
4. Reserve 1/4 cup oats; set aside. Place remaining oats in a food
processor; process 4 seconds or until finely ground. Weigh or lightly
spoon flours into dry measuring cups; level with a knife. Combine
processed oats, flours, baking powder, baking soda, and salt; stir with a
whisk.
5. Place granulated sugar, 1/4 cup brown sugar, and 1/3 cup butter
in a large bowl. Beat with a mixer at medium speed for 3 minutes or
until light and fluffy. Add eggs, 1 at a time, beating well after each
addition. Beat in vanilla. Add flour mixture to sugar mixture
alternately with sour cream, beginning and ending with flour mixture.
(Batter will be slightly lumpy because of oats.) Spoon batter into
prepared pan; spread evenly.
6. Combine remaining 1/4 cup oats, remaining 1/4 cup brown sugar,
nuts, and cinnamon in a bowl. Cut in 1 tablespoon butter with a pastry
blender or 2 knives until well blended. Sprinkle top of batter evenly
with nut mixture. Bake at 350° for 38 minutes or until a wooden pick
inserted in center comes out clean, top is golden, and cake begins to
pull away from sides of pan. Cool cake in pan for 10 minutes; remove
from pan.
Serve these pillowy rolls along with our Holiday Ham with Reisling and Mustard
and set out bowls of your favorite mustards. Double the recipe for a
large crowd–or, if you want to forgo baking your own, brush store-bought
rolls with the egg wash, sprinkle with caraway salt, and warm them in
the oven.
Makes 24 rolls
Ingredients
18-ounce russet potato, peeled, cut into 1" pieces
4tablespoons(1/2 stick) unsalted butter plus more for the bowl and pan
1cupwhole milk
2tablespoonssugar, divided
1 1/2teaspoonskosher salt, divided
11/4-ounce package (2 1/2 teaspoons) active dry yeast
3 3/4cups(or more) all-purpose flour, divided, plus more for surface
1teaspoontoasted caraway seeds, lightly crushed
1teaspoonpretzel salt or sea salt
1large egg
2teaspoonsheavy cream
Preparation
Place the potato in a small
saucepan and add water to cover by 1". Bring to a boil; reduce heat to
medium and simmer until potato is tender, about 15 minutes. Drain,
reserving 1/4 cup cooking liquid in a small microwave-safe bowl.
Meanwhile, melt 4 Tbsp. butter in another small saucepan. Add milk; stir until warm, about 1 minute, and set aside.
Transfer cooked potato to a
large bowl. Mash with a fork, then stir in milk mixture, 1 tbsp. sugar,
and 1/2 tsp. salt (mixture will be slightly lumpy).
Rewarm potato cooking liquid in
microwave (or let cool) until an instant-read thermometer registers
105°–110°. Stir in remaining 1 Tbsp. sugar, 1 tsp. salt, and yeast; let
stand until foamy, about 10 minutes. Add yeast mixture to potato mixture
and stir to combine. Add 3 1/4 cups flour with a wooden spoon and stir
until a sticky dough forms.
Turn dough onto a floured
surface and knead, dusting surface, dough, and your hands often with
remaining 1/2 cup flour to keep dough from sticking, until dough is
smooth, elastic, and slightly sticky, 7–8 minutes. Form into a ball and
transfer to a buttered bowl. Turn to coat dough with butter and cover
bowl with plastic wrap. Let dough rise, chilled, overnight.
Butter baking pan. Mix caraway
seeds and pretzel salt in a small bowl; set aside. Punch down dough (do
not knead). Cut dough in half, then roll each piece into a 12”-long log.
Cut each log into 12 equal pieces, then roll each piece into a ball
(for 24 total). Arrange in pan, evenly spaced, in 6 rows of 4. Cover
loosely with plastic wrap. Let rise in a warm, draft-free place until
almost doubled in size, about 1 hour.
Arrange a rack in middle of
oven and preheat to 375°. Whisk egg and cream in a small bowl; brush
tops of rolls with some of egg wash. Sprinkle with caraway salt. Bake,
rotating pan once, until rolls are cooked through and deep golden, 25–30
minutes. Transfer to wire rack and let cool in pan for 5 minutes, then
run a sharp knife around edges to loosen from pan; do not separate
rolls. Transfer to rack and let cool for 10 minutes. DO AHEAD:Can be made 8 hours ahead. Rewarm, wrapped in foil, in a 300° oven until heated through. Serve warm.
Mocha Muffins let us enjoy both
the flavors of coffee and chocolate. They have a moist and tender crumb and are
full of chopped nuts and chocolate chips (can use cappuccino chips, dark, white, or even milk flavored
chips). Perfect anytime of the day.
Ingredients
2 large eggs
1/2 cup (120 ml) buttermilk
1/2
cup (120 ml) safflower, corn, vegetable, or canola oil
1/4 cup (60 ml)
black coffee or espresso, at room temperature
1 teaspoon pure vanilla extract
1 cup (130
grams) all-purpose flour
3/4 cup (95 grams) whole wheat flour
1/4 cup
(25 grams) regular unsweetened cocoa powder
1 cup (205 grams) light brown
sugar
1/2 teaspoon
baking powder
1 teaspoon baking soda
1/4 teaspoon salt
1/2 cup (120
ml) pecans, walnuts, hazelnuts or almonds, coarsely chopped (optional)
1 cup (240
ml) cappuccino, semisweet, milk, or white chocolate chips
Preheat oven to 375 degrees F (190
degrees C). Place oven rack in center of oven. Line 12
muffin cups with paper liners, or butter or spray with a non stick cooking
spray.
In a large bowl
whisk together the eggs, buttermilk, oil, coffee, and vanilla extract.
In another large bowl
whisk together the flours, cocoa powder, brown sugar, baking powder, baking soda, and
salt. Stir in the chopped nuts and chocolate chips. With a
rubber spatula fold the wet ingredients into the dry ingredients and stir only
until the ingredients are combined. (Do not over mix the batter or the
muffins will be tough.)
Evenly fill
the muffin cups with the batter, using two spoons or an ice
cream scoop. Place in the oven and bake until a toothpick inserted in the
center of a muffin comes out clean, about 18 - 23 minutes. Transfer to a wire
rack and let cool for about 5-10 minutes
before removing from pan. Can be stored at room temperature for a few days
or they can be frozen.
Heat butter in a medium
saucepan over low heat until melted and just beginning to foam. Whisk in
2 Tbsp. flour; cook, stirring often, until flour begins to smell nutty,
about 5 minutes. Whisk in milk; cook gently over low heat, stirring
often, until mixture thickens, about 20 minutes. Add cheese; whisk until
combined. Season Mornay sauce to taste with cayenne, nutmeg, and
salt. DO AHEAD Mornay sauce can be made 2 days ahead. Cover and chill.
Cook bacon in a medium skillet over medium heat until crisp and browned; transfer to paper towels to drain; set aside.
Build a medium-hot fire in a
charcoal grill, or heat a gas grill to high. Place onion in a medium
bowl. Drizzle with 2 tsp. oil; season with salt and pepper. Grill onion,
turning occasionally, until tender, about 10 minutes. Transfer to a
large bowl. Place apples in same medium bowl; drizzle with 2 tsp. oil.
Grill, turning occasionally, until charred in spots and tender, about
12 minutes.
Transfer apples to large bowl
with onion; add rosemary, sage, thyme, and reserved bacon. Toss to
combine. Season with salt and pepper and cover; keep warm.
Rewarm Mornay sauce over medium-low heat, stirring occasionally. Stir in crème fraîche and set aside.
Divide pizza dough into 2 equal
pieces; shape each piece into a ball. Roll out each ball on a floured
surface to an 8-inch round. Brush with 1 tsp. oil; place on grill,
oiled sides down. Brush other sides with remaining 1 tsp. oil.
Grill flatbreads, watching
carefully and moving as needed to promote even cooking and prevent
burning, until charred and crisp on bottom, 1–2 minutes. Turn flatbreads
over and cook until crisp and cooked through, 1–2 minutes longer.
Transfer flatbreads to a work surface.
Spread half of warmed Mornay sauce over each flatbread. Top sauce with apple mixture. Cut flatbreads into wedges.
I love baking bread using this recipe. It represents the perfect
balance between work and results. If you try it, it will end up being
the gateway drug to more complicated bread recipes.
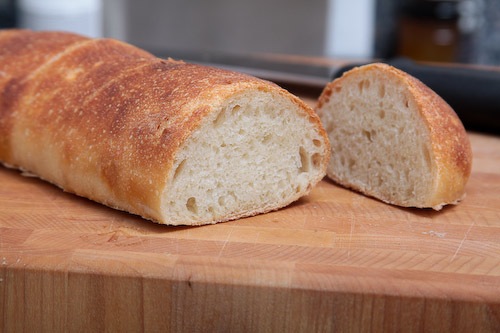
Don’t let the simplicity of the recipe fool you though, the bread is
amazingly good. The crumb is full of small holes, with a crust that is
chewy but not tough. The long, overnight rise gives the bread a complex
flavor. Letting the entire batch of dough sit all night gives the dough
plenty of time to relax and makes it a little easier to work with.
I usually bake two batches (four oven loads) of bread and freeze most
of it. We then take out a loaf or two and let it defrost in the fridge
whenever we need bread. There are many ways to shape the bread. The
simplest shape is to simply spread the dough out, cut it into strips and
then stretch those strips out. This time I shaped the dough into two,
slightly more complex shapes. The torpedo is perfect for cutting in half
horizontally and making sandwiches. You can also take the
torpedo-shaped dough and turn it into a baguette. These baguettes are a
little skinny, but are perfect for breakfast toast.
I like to spray the crusts of the bread with water before I place
them in the oven. It gives the crusts a bubbly, crisp crust. If you
don’t do this the breads will have a floury crust that also looks
awesome. I would try a mix of the two methods and see which you like
best.
This recipe produces a very wet dough. You are going to have to use a bit of flour when handling it. I got a Pastry Mat
, and I think it helps a bit. Another good tool to have is a large plastic tub or two to let the dough rise in overnight in the fridge. Lids are separate, don’t forget to order them. The final tool is a flexible bowl scrapper, which is great for dividing the dough and moving it around.
This recipe comes from The Bread Baker's Apprentice, an amazing book from Peter Reinhart. If
you like to bake, this is a book you must own. The recipe below doesn’t
do it justice because the recipe builds upon techniques taught earlier.
The book gives you detailed recipes for almost every style of bread out
there, along with the techniques you will need to make those breads. I
got my copy as a wedding gift from my friend Alex, thanks Alex! Teach a
man to bake and he will have bread for life!
This is a very forgiving recipe. Don’t worry if it looks complicated,
you can leave steps out, get a little sloppy and still get good
results. Instead of worrying about the water temperature for the dough, I
just use cold tap water. Instead of fumbling with a pan of water in the
oven, I just spray down the sides of the oven. It is more important to
try this recipe than worry about its exacting details.
Days to Make: 2 Day 1: 10 to 15 minutes mixing. Day 2: 2 to 3 hours fermentation, shaping, and panning; 15 to 30 minutes baking.
Ingredients:
6 cups (27 ounces) unbleached bread flour
2 1/4 teaspoons (.56 ounce) salt
1 3/4 teaspoons (.19 ounce) instant yeast
2 1/4 cups plus 2 tablespoons to 3 cups (19 to 24 ounces) ice cold water (40°F)
Directions: Day 1
Combine the flour, salt, yeast and 19 ounces of water in the bowl of
the electric mixer with the paddle attachment and mix for 2 minutes on
low speed. Switch to the dough hook and mix for 5 to 6 minutes on medium
speed.
The dough should be sticky on the bottom of the bowl, but it should
release from the sides of the bowl. If not, sprinkle in a small amount
of flour until this occurs (or dribble in water if the dough seems too
stiff and clears the bottom as well as the sides of the bowl).
Lightly oil a large bowl and immediately transfer the dough with a
spatula or bowl scraper dipped in water into the bowl. Mist the top of
the dough with spray oil and cover the bowl with plastic wrap.
Immediately place the bowl in the refrigerator and retard overnight.
Day 2
The next day, check the dough to see if it has risen in the
refrigerator. It will probably be partially risen but not doubled in
size (the amount of rise will depend on how cold the refrigerator is and
how often the door was opened). Leave the bowl of dough out at room
temperature for 2 to 3 hours (or longer if necessary) to allow the dough
to wake up, lose its chill, and continue fermenting.
When the dough has doubled from its original pre-refrigerated size,
liberally sprinkle the counter with bread flour (about 1/2 cup). Gently
transfer the dough to the floured counter with a plastic dough scraper
that has been dipped in cold water, dipping your hands as well to keep
the dough from sticking to you. Try to degas the dough as little as
possible as you transfer it. If the dough is very wet, sprinkle more
flour over the top as well as under it. Dry your hands thoroughly and
then dip them in flour.
Roll the dough gently in the sprinkled flour to coat it thoroughly,
simultaneously stretching it into an oblong about 8 inches long and 6
inches wide. If it is too sticky to handle, continue sprinkling flour
over it. Dip a metal pastry scraper into cool water to keep it from
sticking to the dough, and cut the dough in half widthwise with the
pastry scraper by pressing it down through the dough until it severs it,
then dipping it again in the water and repeating this action until you
have cut down the full length of the dough. (Do not use this blade as a
saw; use it as a pincer, pinching the dough cleanly with each cut.) Let
the dough relax for 5 minutes. Shape the dough pieces using one or more of the techniques below.
Prepare the oven for hearth baking by placing a pizza stone or baking tile on the a rack set to the second lowest position. (Optional: Set an empty pan for steam on a rack set below this.)
Preheat the oven to 500°F (550°F if your oven goes this high).
Take 1 pan to the preheated oven and carefully slide the dough,
parchment and all, onto the baking stone (depending on the direction of
the stone, you may choose to slide the dough and parchment off the side
of the sheet pan instead of off the end); or bake directly on the sheet
pan. Make sure the pieces aren’t touching (you can reach in and
straighten the parchment or the dough strips if need be).
(Optional: Pour 1 cup of hot water into the steam pan and close the door.)
After 30 seconds, spray the oven walls with water and close the
door. Repeat twice more at 30-second intervals. After the final spray,
reduce the oven setting to 475°F and continue baking. Meanwhile, dust
the other pan of dough strips with flour, mist with spray oil, and cover
with a towel or plastic wrap. If you don’t plan to bake these strips
within 1 hour, refrigerate the pan and bake later or the next day. If
you’d like to bake them as rustic, ciabatta-style breads, leave them at
room temperature for 1 to 2 hours and then bake. As the loaves proof,
they will resemble and perform like ciabatta.
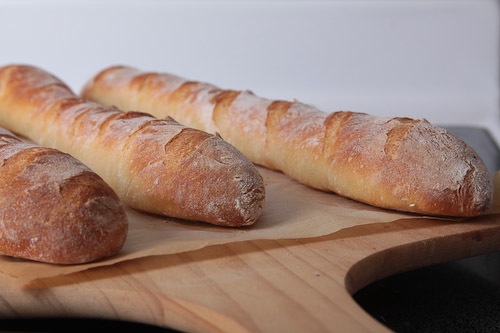
The bread should begin to turn golden brown within 8 or 9 minutes.
If the loaves are baking unevenly at this point, rotate them 180
degrees. Continue baking 10 to 15 minutes more, or until the bread is a
rich golden brown and the internal temperature registers at least 205°F.
Transfer the hot breads to a cooling rack. They should feel very
light, almost airy, and will cool in about 20 minutes. While these are
cooling, you can bake the remaining loaves, remembering to remove the
parchment from the oven and turn the oven up to 500°F or higher before
baking the second round.
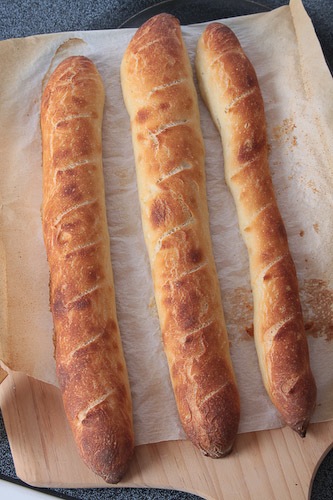
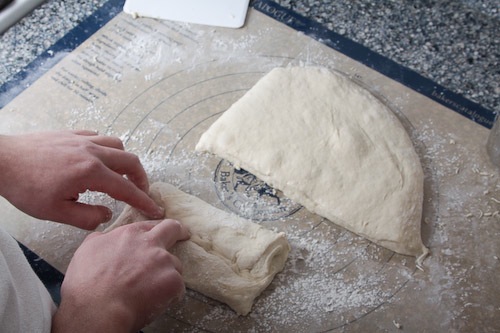
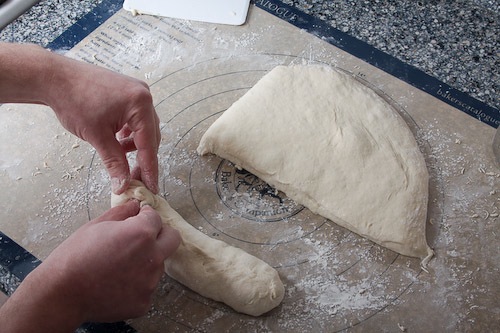
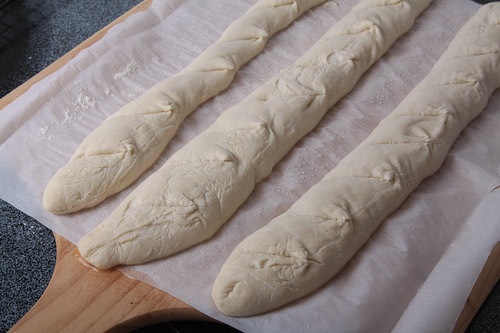
Shaping: Basic
Take one of the dough pieces and repeat the cutting action, but this
time cut off three equal-sized lengths. Then do the same with the
remaining half. This should give you six lengths.
Cover the back of two 17-by-12-inch sheet pans with baking parchment and dust with semolina flour or cornmeal.
Flour your hands and carefully lift one of the dough strips and
transfer it to an inverted parchment-lined pan, gently pulling it to the
length of the pan or to the length of your baking stone. If it springs
back, let it rest for 5 minutes and then gently pull it out again. Place
three strips on the pan, and then prepare another pan and repeat with
the remaining strips.
Score the dough strips as for baguettes, slashing the tops with
three diagonal cuts. Because the dough is sticky, you may have to dip
the razor blade, serrated knife or scissors in water between each cut.
You may also omit the cuts if the dough isn’t cooperating.
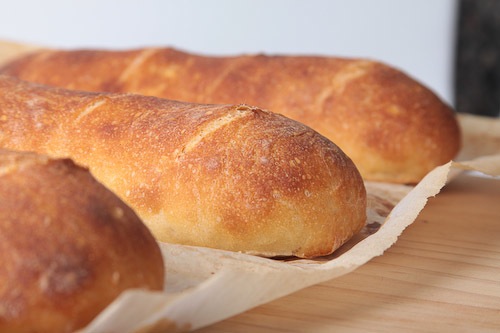
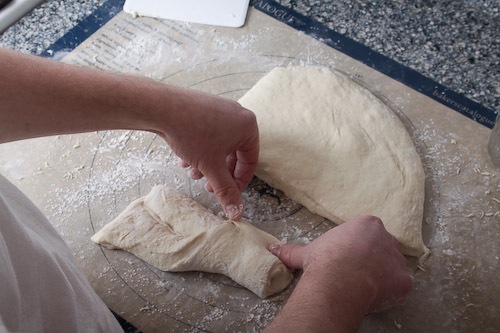
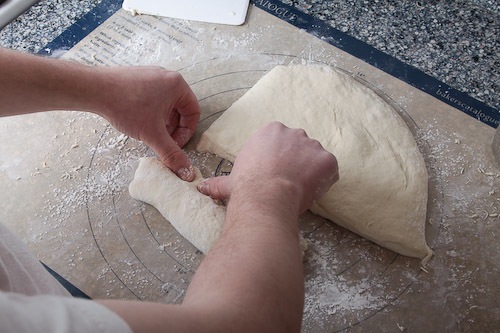
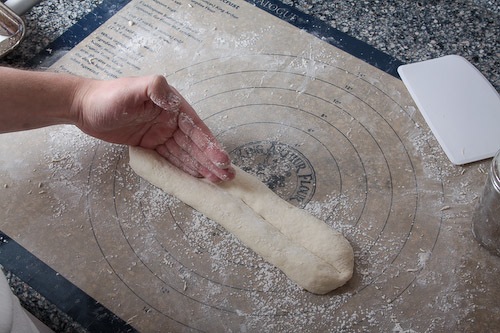
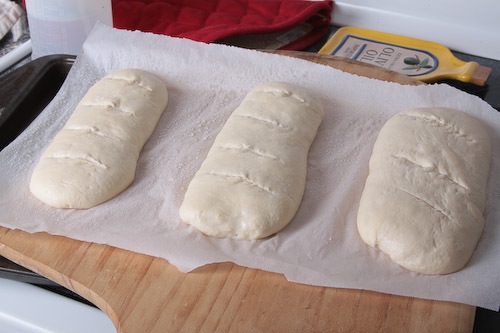
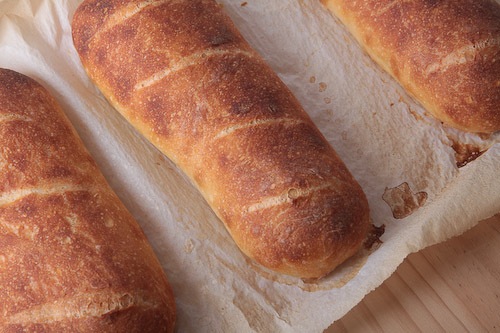
Torpedo
Take one of the dough pieces and repeat the cutting action, but this
time cut off three equal-sized lengths. Then do the same with the
remaining half. This should give you six lengths.
Cover the back of two 17-by-12-inch sheet pans with baking parchment and dust with semolina flour or cornmeal.
Flour your hands and transfer one of the dough pieces to a well floured area. Gently pat the dough into a rough rectangle.
Without degassing the piece of dough, fold the bottom third of
dough, letter style, up to the center and press to seal, creating
surface tension on the outer edge.
Fold the remaining dough over the top.
Use your hand to seal the seam closed and to increase the surface tension all over.
Flip the dough over and fold the very ends of the piece, pinching to close.
Flip the dough back over so that the seam is on the bottom and set aside to rise or shape into a baguette.
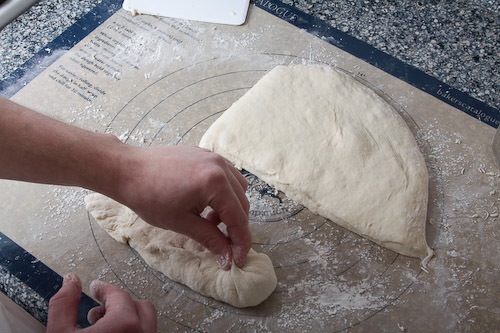
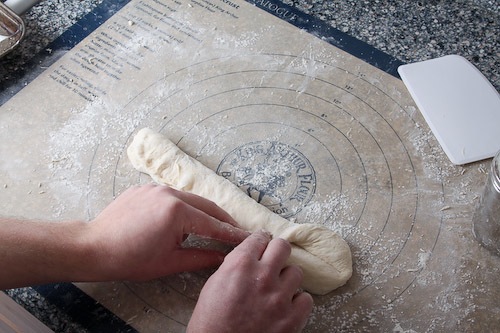
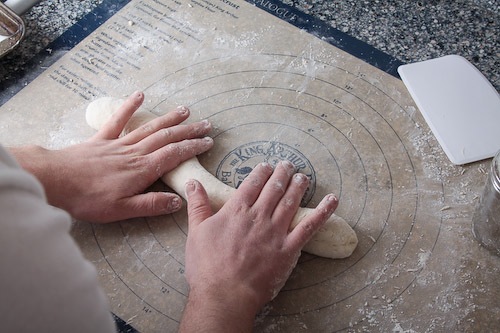
Baguette
Shape the pieces as torpedos and allow them to rest for 5 minutes.
Lift the dough and gently pull it out from the ends.
Crease the dough down the middle.
Fold the top part of the dough down over the bottom part.
Use your hand to seal the seam closed and to increase the surface tension all over.
Working from the center of the loaf and moving towards the edges,
gently but firmly rock and roll out the dough to extend it to the
desired length.
If the dough is too elastic and springs back to less than the desired length, allow it to rest for another 5 minutes.
Mix the yeast, salt, spinach, cheese, and sugar with the water in a 5-quart bowl, or a lidded (not airtight) food container.
Mix in the remaining dry ingredients without kneading, using a spoon, a 14-cup capacity Food Processor
(with dough attachment), or a heavy duty stand mixer (with dough
hook). If you’re not using a machine, you may need to use wet hands to
incorporate the last bit of flour.
Cover (not airtight), and allow to rest at room temperature until
the dough rises and collapses (or flattens on top), approximately 2
hours.
The dough can be used immediately after the initial rise, though it
is easier to handle when cold. Refrigerate in a lidded (not airtight)
container and use over the next 7 days.
On baking day, dust the surface of the refrigerated dough with flour
and cut off a 1-pound (grapefruit-size) piece. Dust the piece with more
flour and quickly shape it into a ball by stretching the surface of the
dough around to the bottom on a ll four side, rotating the ball in a
quarter-turn as you go. Then form a oval-shaped loaf. Allow to rest and
rise on a cornmeal-covered Pizza Peel
for 20 minutes to an hour, or 40 minutes if you’re using fresh, unrefrigerated dough.
Twenty minutes before baking time, preheat the oven to 450ºF, with a Baking Stone
placed on the middle rack. Place an empty broiler tray on any other shelf that won’t interfere with the rising bread.
Sprinkle the loaf liberally with flour and slash parallel cuts
across the loaf, using a serrated bread knife. Leave the flour in place
for baking; tap some of it off before eating.
Slide the loaf directly onto the hot Baking Stone
.
Pour 1 cup of hot tap water into the broiler tray, and quickly close
the oven door. Bake for about 30 to 35 minutes, until deeply browned
and firm. Smaller or larger loaves will require adjustments in baking
time.
Emporio Rulli’s Grissini Torinesi (Turin-style Breadsticks) Makes about 5 dozen
The Dough 1 tablespoon active dry yeast 1½ cups lukewarm water (about 100 degrees) 3 cups plus 2 tablespoons unbleached bread flour 2/3 cup semolina flour 2 tablespoons unsalted butter, softened 1 tablespoon extra virgin olive oil 1 tablespoon kosher saltFor shaping ½ cup unbleached bread flour ½ cup semolina flour ½ teaspoon salt 2 tablespoons extra virgin olive oil 1 tablespoon water
For the dough: In
a small bowl sprinkle the yeast over ¼ cup of the lukewarm water and
let stand 2 minutes to soften. Whisk with a fork to dissolve the yeast,
and let stand 5 minutes to activate.
In
the bowl of a stand mixer, combine the yeast-water mix, bread flour,
semolina flour, butter, olive oil, salt and remaining 1¼ cups of water.
Mix with a dough hook on medium speed for about 10 minutes; the dough
will clear the sides of the bowl.
Alternately, mix the dough by hand
with a wooden spoon, and then knead by hand for 10 minutes. Shape
the dough into a ball and place in an oiled bowl. Turn to coat the
dough with the oil, cover the bowl with plastic wrap, and let the dough
rise until doubled, about 1 hour.
For Shaping: Combine
the bread flour, semolina flour and salt in a small bowl and stir to
blend. In another small bowl, combine the olive oil and water.
Lightly oil 4 heavy-rimmed baking sheets (or bake in batches).
Sprinkle
the work surface thickly with the flour mixture. Turn the dough out
onto the work surface and flatten it with a rolling pin into an 18 x 6
inch rectangle. If the dough feels too soft and slack to shape the
breadsticks, transfer the dough to a floured sheet pan and place in the
freezer for about 10 minutes to firm it. Return it to the floured work
surface before continuing.
Brush
the surface of the rectangle with the oil-water mixture, and then
sprinkle generously with some of the flour mixture. With a chef’s knife
cut the dough into 6 inch by ¼ inch strips, cutting just a few at a
time. With your hands, pick up each strip by the ends. The dough is so
supple that it will elongate as you lift it. Allow each strip to become
only as long as the baking sheet, then arrange them side by side on the
baking sheet, close but not touching. Let rise about 30 minutes.
Preheat
oven to 350 degrees. Bake the breadsticks until caramel-brown all the
way through (test by breaking one open), about 30 minutes. Cool on a
rack.Per Breadstick: 50 calories, 1 g protein, 8 g carbohydrate, 1 g fat (0 saturated), 1 mg cholesterol, 125 mg sodium, 0 fiber.
I add about ½ c finely grated parmesan cheese and a
scant ½ teaspoon of black pepper. I have sprinkled kosher salt and
cracked pepper on the baking sheets and also placed ample amounts of
grated parmesan cheese on a sheet and the more cheese on top of the
unbaked breadstick. We like the cheese ones best, but the plain ones a
re really good as well.